


6 Proven Steps for Troubleshooting Truck Blower Motors Like a Pro
syyskuu 5, 2025
Abstrakti
The operational integrity of a truck's heating, ventilation, and air conditioning (HVAC) system is fundamentally dependent on its blower motor. A failure in this component directly compromises cabin climate control, affecting driver comfort and safety, particularly during adverse weather conditions. This article presents a systematic and comprehensive methodology for troubleshooting truck blower motors. It examines the diagnostic process, beginning with the interpretation of auditory and functional symptoms, such as unusual noises or inconsistent airflow. The investigation proceeds to elementary checks, including fuse, relay, and cabin air filter inspections. Subsequently, the discourse advances to more technical electrical testing procedures involving the blower motor resistor, associated wiring, and the motor itself, utilizing tools like multimeters. The analysis distinguishes between common failure points and more complex, intermittent issues, providing a structured framework for isolating the root cause. The objective is to equip truck owners and maintenance professionals with the knowledge to perform an accurate diagnosis, differentiate between repair and replacement scenarios, and execute a successful component replacement, thereby restoring full functionality to the HVAC system.
Keskeiset asiat
- Begin by diagnosing symptoms; airflow only on high speed often indicates a bad blower motor resistor.
- Always check simple fixes first: inspect the cabin air filter, fuses, and relays before complex tests.
- Use a multimeter to verify 12V power and a solid ground at the motor's connector to confirm its failure.
- A comprehensive approach to troubleshooting truck blower motors saves time by eliminating possibilities systematically.
- Noises like grinding or clicking usually point directly to a failing motor or debris in the fan cage.
- When replacing the motor, choose a high-quality part to ensure longevity and proper electrical performance.
- After installation, test all fan speeds and functions to confirm the repair was successful.
Sisällysluettelo
- The Foundational Role of the Blower Motor in a Truck's HVAC System
- Step 1: Initial Assessment and Symptom Analysis
- Step 2: Ruling Out the Simplest Culprits
- Step 3: Electrical Testing of the Blower Motor Circuit
- Step 4: In-Depth Examination of the Truck Blower Motor Itself
- Step 5: Advanced Diagnostic Scenarios and Complications
- Step 6: Replacement, Reassembly, and Final Verification
- Usein kysytyt kysymykset (FAQ)
- Conclusion
- Viitteet
The Foundational Role of the Blower Motor in a Truck's HVAC System
Before one can embark on the nuanced process of diagnosis and repair, a foundational understanding of the subject is paramount. The truck blower motor, though a relatively simple component in its construction, holds a position of profound importance within the intricate web of the vehicle's climate control system. It is not merely a fan; it is the prime mover of air, the very heart that circulates warmth from the heater core and coolness from the evaporator throughout the cabin. Its function is analogous to the lungs in a biological system, drawing in air and directing it with purpose. A failure of this one component renders the entire heating and air conditioning apparatus inert, transforming a comfortable cabin into an environment subject to the whims of the outside weather. This section seeks to build that foundational understanding, exploring the ecosystem in which the motor operates, its internal anatomy, and the common ways in which it begins to fail.
Understanding the Climate Control Ecosystem
To appreciate the blower motor's role, we must visualize the entire HVAC system as a cooperative network. The process begins when you, the operator, make a request via the dashboard controls. This request, whether for heat, cold air, or simple ventilation, is an electrical signal sent to the HVAC control module. This module is the brain of the operation. In response, the module orchestrates a series of actions. If heat is requested, it commands a valve to allow hot engine coolant to flow through the heater core, a small radiator-like device located inside the dashboard. If air conditioning is desired, it engages the A/C compressor clutch, starting the refrigeration cycle that chills the evaporator core.
Here is where the truck blower motor enters the narrative. The control module sends a separate signal, routed through a resistor or a control unit, to the blower motor, commanding it to spin at a certain speed. The motor's fan, often called a squirrel cage, draws air either from the outside or from within the cabin. This air is then forced through a plenum, a dedicated chamber, where it passes over either the hot heater core or the cold evaporator core. Finally, a series of blend doors—small flaps controlled by electric or vacuum actuators—direct this newly conditioned air to the desired vents: the floor, the dashboard, or the defroster. A failure anywhere in this chain can mimic a blower motor problem, yet the motor itself is the agent of all airflow. Without its forceful push, the heat generated by the heater core or the cold produced by the evaporator remains trapped within the dash, of no use to the occupants.
The Anatomy of a Truck Blower Motor
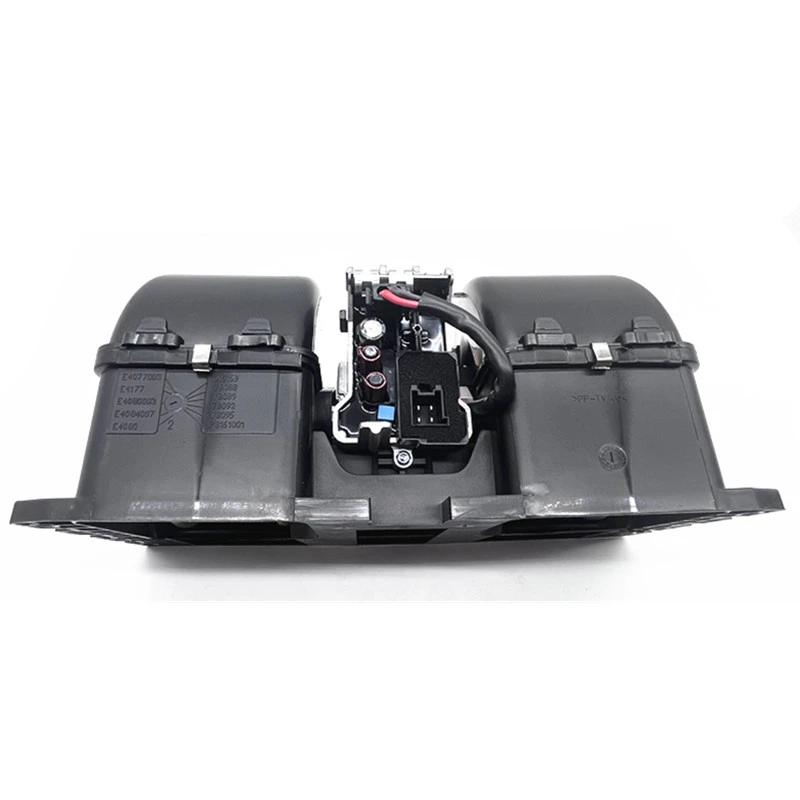
At its core, the truck blower motor is a fractional horsepower direct current (DC) electric motor. Its design has remained remarkably consistent over the decades, a testament to its simple efficiency. The main components include the outer casing, which houses the motor's internal workings and provides mounting points. Inside this casing is the armature, a series of wire windings around an iron core, which is mounted on a central shaft. This shaft is supported by bearings or bushings at either end, which allow it to spin freely. Surrounding the armature are permanent magnets.
The flow of electricity is managed by a set of carbon brushes. These brushes are spring-loaded to maintain physical contact with the commutator, a segmented copper ring at one end of the armature. When you select a fan speed, electricity flows from the vehicle's electrical system, through the brushes, into the commutator, and through the armature windings. This creates an electromagnetic field that interacts with the field of the permanent magnets, causing the armature to rotate. The speed of this rotation is controlled by varying the voltage supplied to the motor. Attached to the other end of the motor's shaft is the squirrel cage fan, a plastic or metal wheel with many small fins designed to move a large volume of air at relatively low pressure. The entire assembly is a marvel of electromechanical simplicity, designed for tens of thousands of hours of operation.
Common Failure Modes and Their Root Causes
The eventual failure of a blower motor is an inevitability rooted in its very design. The most common point of failure is the bearings or bushings that support the motor shaft. Over time, the lubricant within them dries out or becomes contaminated, leading to increased friction. This friction manifests as the dreaded squealing or grinding noise that is often the first sign of trouble. As the friction worsens, the motor has to draw more electrical current to overcome the resistance, which can lead to overheating and eventual seizure.
Another frequent failure point involves the carbon brushes and the commutator. The brushes are, by design, a wear item. With every rotation of the motor, a microscopic amount of carbon is worn away. Eventually, the brushes become too short to maintain proper contact with the commutator, resulting in intermittent operation or complete failure. The motor might work only when jarred, or it may stop altogether. Arcing between worn brushes and the commutator can also cause damage to the commutator segments, creating a rough surface that accelerates further brush wear. In less common scenarios, the internal windings of the armature can develop a short or an open circuit, usually from prolonged overheating, which will render the motor inoperative. Understanding these fundamental failure mechanisms is the first step in forming a coherent diagnostic strategy for troubleshooting truck blower motors.
Step 1: Initial Assessment and Symptom Analysis
The process of troubleshooting any mechanical or electrical system effectively begins not with a wrench or a multimeter, but with careful observation. The vehicle provides clues, and a thoughtful technician acts as an interpreter, translating symptoms into a list of probable causes. Before a single panel is removed or a wire is tested, a thorough assessment of the problem's characteristics can narrow the field of possibilities immensely. This initial phase is about engaging the senses—listening for abnormal sounds, feeling for the presence or absence of airflow, and noting the specific conditions under which the fault appears. This disciplined approach prevents wasted effort and diagnostic dead ends, guiding you toward the source of the issue with greater efficiency. It is the difference between a targeted inquiry and a blind search.
The Art of Listening: Deciphering Blower Motor Noises
A functioning blower motor should be relatively quiet, producing little more than the sound of moving air. The introduction of any new, distinct noise is a significant diagnostic clue. It is worth taking a moment to sit in the cabin, close the doors to minimize external noise, and cycle the fan through all its speeds. What do you hear?
A high-pitched squeal or a metallic grinding sound is one of the most common indicators of a failing motor. This noise is almost universally caused by worn-out or dry motor shaft bearings. The sound may be present at all speeds or only appear at lower or higher RPMs. It may also change in pitch as you cycle through the fan settings. This noise is a clear signal that the motor's mechanical components are failing.
A rhythmic clicking or ticking sound, especially one that increases in frequency as you increase fan speed, often points to a foreign object striking the blades of the squirrel cage fan. Leaves, pieces of paper, or other debris can be drawn into the system, particularly if the cabin air filter is missing or damaged. The fan is attempting to chop up the debris, resulting in the distinct noise.
A low-pitched hum or a whining that seems electrical in nature can suggest a different problem. While it can sometimes be a precursor to bearing failure, it can also indicate an electrical issue within the motor itself, such as a problem with the windings or excessive electrical load due to internal resistance. A rattling sound, conversely, is often mechanical. It could be caused by loose mounting bolts allowing the entire motor assembly to vibrate against its housing, or it could indicate that the squirrel cage fan itself is damaged, with cracked fins creating an imbalance as it spins.
Airflow Anomaly Diagnosis
Beyond sounds, the primary function of the blower motor is to move air. How it fails in this duty is just as revealing as the noises it makes. The most common symptom is a complete lack of airflow at any fan speed. When you turn the control knob and nothing happens—no sound, no air—it points toward a global failure in the power supply circuit. The list of suspects includes a blown main fuse, a failed blower relay, a break in the primary power or ground wire, a faulty control switch, or a completely dead motor.
Perhaps the most classic and telling symptom in all of HVAC diagnostics is when the fan operates only on its highest speed setting. This specific behavior points with near certainty to a failed blower motor resistor. In a typical system, the lower fan speeds are achieved by routing the electrical current through a series of resistors, which reduce the voltage reaching the motor. The highest fan speed setting, however, is designed to bypass this resistor block entirely, sending full battery voltage directly to the motor. Therefore, if the resistor pack fails (usually by burning out one of the resistive coils), the lower speeds will cease to function, but the direct-wired high speed will continue to work.
Weak or intermittent airflow presents a more ambiguous diagnostic challenge. Weak airflow, assuming no unusual noises, could be as simple as a severely clogged cabin air filter starving the system for air. It could also suggest a motor that is worn and no longer capable of reaching its designed RPM. Intermittent operation—where the fan cuts in and out, perhaps in response to hitting a bump in the road—strongly suggests a poor electrical connection. This could be a loose wire at the motor's connector, a worn-out spot in the motor's commutator, or a faulty connection at the resistor or control switch.
| Symptom | Most Likely Cause | Secondary Possibilities |
|---|---|---|
| No airflow on any speed | Blown fuse or failed relay | Failed motor, faulty switch, wiring issue |
| Airflow on high speed only | Failed blower motor resistor | Faulty fan switch, wiring short |
| Grinding or squealing noise | Worn motor bearings | Debris in motor, fan cage rubbing housing |
| Clicking or rattling noise | Debris in squirrel cage fan | Damaged fan, loose mounting bolts |
| Weak or intermittent airflow | Clogged cabin air filter | Failing motor, loose electrical connection |
Creating a Diagnostic Log: Your First Step to an Accurate Fix
To synthesize these observations into a coherent plan, it is helpful to create a simple diagnostic log. This does not need to be complex; a note on your phone or a piece of paper will suffice. The goal is to document the "personality" of the failure. Record the following:
- The primary symptom: Is it noise, a lack of airflow, or both?
- The specifics of the symptom: What does the noise sound like? Does the airflow work on any speeds?
- Conditions for occurrence: Does it happen all the time? Only when the engine is hot? Does hitting a bump affect it?
- Recent history: Has any other work been done on the vehicle recently? Did the problem start suddenly or develop over time?
This simple act of documentation forces a more rigorous analysis of the problem. It provides a clear starting point and a reference as you move through the subsequent steps of troubleshooting truck blower motors. This log is your case file, transforming you from a parts-swapper into a genuine diagnostician.
Step 2: Ruling Out the Simplest Culprits
In the complex world of automotive diagnostics, there is a guiding principle of profound wisdom: start with the simplest and most accessible solutions first. It is a common and costly error to immediately suspect a major component failure when the true culprit is a minor, easily rectified issue. Before delving into the intricacies of electrical circuits or undertaking the physical removal of parts, a few preliminary checks are in order. These components are often designed to be the "weak links" in the system, sacrificing themselves to protect more expensive parts like the blower motor itself. By systematically inspecting the cabin air filter, fuses, and relays, you can often resolve the problem in minutes, saving significant time, expense, and frustration.
The Cabin Air Filter: An Overlooked Guardian
The cabin air filter is one of the most frequently neglected maintenance items on any vehicle, yet its impact on the HVAC system is immense. Its primary job is to clean the air entering the cabin, trapping dust, pollen, leaves, and other debris. Its secondary, and equally vital, role is to protect the components downstream, most notably the blower motor and the A/C evaporator core.
When this filter becomes clogged, it acts like a dam, severely restricting the volume of air the blower motor can draw in. The immediate effect is a noticeable reduction in airflow from the vents. You might have the fan on high, but the output feels weak and unsatisfying. This forces the blower motor to work much harder to try and pull air through the dense mat of debris. This sustained strain increases the electrical current draw of the motor, leading to excess heat buildup in its windings and wiring. Over time, this can significantly shorten the motor's lifespan, causing premature bearing failure or electrical burnout. A clogged filter is not just an inconvenience; it is a direct threat to the health of your blower motor.
Locating and inspecting the cabin air filter is typically a straightforward task. In most heavy-duty trucks, it is located behind the glove box. You may need to release the glove box door by detaching its support struts or squeezing the sides to let it swing down completely. Behind it, you will usually find a rectangular cover with clips or a few small screws. Removing this cover reveals the filter element. Slide it out and hold it up to a light source. If you cannot see light passing through it, or if it is visibly filled with leaves, dirt, and other contaminants, it is long past due to be replaced. Replacement is a simple matter of sliding a new filter in—paying attention to the airflow direction arrow printed on its side—and reassembling the glove box. This single, simple action can sometimes completely restore HVAC performance.
Fuse and Relay Inspection: The System's First Line of Defense
The electrical circuit that powers the blower motor is designed with several layers of protection, the most fundamental of which are the fuse and the relay. The fuse is a sacrificial component containing a thin metal strip designed to melt and break the circuit if the current draw exceeds a safe level. This prevents the motor from overheating and potentially causing a fire in the event of a seizure or short circuit. The relay is an electromagnetic switch that uses a small current from the dashboard controls to switch on the large current required to run the blower motor. This protects the delicate dashboard switch from the high amperage load.
When a blower motor fails to operate on any speed, the fuse and relay are the primary suspects. Your first task is to locate the correct fuse box. Trucks often have multiple fuse boxes—one in the engine compartment and one or two inside the cabin (often on the side of the dashboard or under it). Your vehicle's owner's manual is the definitive guide here. The manual or the diagram on the fuse box cover will identify which fuse and relay are dedicated to the "Blower," "HVAC," or "Heater" system.
Once located, pull the specified fuse using a fuse puller or a pair of needle-nose pliers. Visually inspect the metal strip inside. If it is broken or looks burnt, the fuse is blown and must be replaced. It is absolutely vital to replace it with a new fuse of the exact same amperage rating. Using a higher-rated fuse defeats the protection and creates a serious fire hazard. If the fuse appears intact, it's still wise to test it for continuity with a multimeter, as sometimes a break can be difficult to see.
Testing a relay can be slightly more involved. The simplest method for a novice is to identify another identical relay in the fuse box that controls a non-critical system (like the horn) and swap it with the blower motor relay. If the blower now works and the other system does not, you have confirmed a failed relay. This is a quick and effective diagnostic trick that requires no special tools.
Checking for Physical Obstructions
The final simple check involves a search for physical blockages. The squirrel cage fan moves a significant amount of air, and it can act like a vacuum, pulling in any loose debris in its vicinity. Rodents are also known to build nests in the sheltered confines of the HVAC plenum, particularly in vehicles that sit for extended periods.
This check may require the removal of the blower motor itself, which usually involves removing a few screws or twist-locking it out of the HVAC housing under the passenger-side dashboard. Before doing so, however, a preliminary check can be made. Turn the fan on and listen carefully at the passenger footwell. Do you hear the sound of debris rattling around? If you have access to a flexible borescope camera, it can be an invaluable tool for peering into the air intake ducts or the blower housing without disassembly. If you do remove the motor, carefully inspect the fan cage for any entangled leaves, paper, insulation, or nesting material. Also, look up into the housing from which you removed the motor. A significant blockage here will impede airflow just as much as a clogged filter. Clearing any such obstructions is a necessary step before installing a new motor or reinstalling the old one.
Step 3: Electrical Testing of the Blower Motor Circuit
After confirming that the simplest potential issues are not the cause, the diagnostic process must evolve, moving into the realm of electrical testing. This phase requires a more methodical approach and the use of specific tools to measure the invisible forces of voltage and resistance. It is here that we transition from observation to empirical measurement. The goal is to trace the path of electricity from its source to the blower motor, identifying any point along that path where the flow is interrupted or improperly regulated. This systematic electrical interrogation will definitively pinpoint the failed component, whether it is the resistor pack that controls fan speed, the wiring that carries the current, or the motor itself. This is the core of professional troubleshooting.
Essential Tools for Electrical Diagnosis
To proceed, two basic tools are indispensable: a digital multimeter and a test light. A modern digital multimeter is a versatile device capable of measuring voltage, resistance (in ohms), and continuity. For the purposes of troubleshooting truck blower motors, it is the most powerful tool in your arsenal. A test light is a simpler device, consisting of a probe, a light bulb, and a ground clip. It offers a quick, intuitive way to confirm the presence or absence of voltage in a circuit. While a multimeter provides precise quantitative data, a test light gives a simple "yes/no" answer, which can be very useful for quick checks (Byron Mankiewicz, 2025).
Before beginning any electrical testing, a critical safety protocol must be observed. When you are inspecting or unplugging components, it is wise to disconnect the negative terminal of the truck's battery to prevent any accidental short circuits. However, for many of the tests that follow, the circuit will need to be energized to take measurements. In these cases, exercise extreme caution. Ensure the vehicle is in park or neutral with the parking brake set. Be mindful of moving engine parts if you are working in the engine bay. Always connect the ground clip of your test light or the black probe of your multimeter to a known good ground—a solid, unpainted metal part of the vehicle's chassis or the negative battery terminal—before probing for power.
Testing the Blower Motor Resistor (or Control Module)
The classic symptom of a fan that only works on the highest setting almost always leads us to the blower motor resistor. This component is typically located in the HVAC housing, positioned directly in the path of the airflow from the blower motor. This placement is intentional, as the moving air is used to cool the resistive coils, which generate significant heat as they reduce voltage to the motor.
To test a traditional resistor pack, first, locate and unplug its electrical connector. You will see a series of pins. Set your multimeter to the resistance (Ω) setting. The procedure involves measuring the resistance between the "common" power input pin and each of the output pins that correspond to the lower fan speeds. The owner's manual or a wiring diagram is invaluable here, but a general principle applies:
- Place one multimeter probe on the pin that supplies power to the resistor pack.
- Place the other probe on the pin for the lowest fan speed. You should read a specific resistance value (e.g., 2.0-3.0 ohms).
- Move the second probe to the pin for the next highest speed. You should read a lower resistance value (e.g., 1.0-1.5 ohms).
- Continue this for all speeds. The resistance should decrease as the fan speed increases.
- If you read an infinite resistance or "OL" (Open Line) on any of the pins, that part of the resistor is burned out and has failed.
Many modern trucks, especially those with automatic climate control and variable fan speeds, do not use a traditional resistor pack. Instead, they use a solid-state Blower Motor Control Module, sometimes called a Final Stage Unit. This module uses transistors to control motor speed with much greater precision. Testing this module is different. It cannot be accurately tested with a simple resistance check. The diagnostic approach is to verify its inputs and outputs. Using your multimeter set to DC volts, you would check for:
- Good power and ground going into the module.
- A control signal coming from the HVAC head unit (this is often a variable voltage signal, e.g., 0-5V).
- A variable voltage output going to the blower motor, which should change as you adjust the fan speed on the dash.
If the module has correct power, ground, and a changing input signal but is not producing an output, the module itself has failed.
| Test Point (Traditional Resistor) | Expected Multimeter Reading (Example) | Common Fault Indication |
|---|---|---|
| Input Pin to Low Speed Pin | 2.5 Ω | "OL" or Infinite Resistance |
| Input Pin to Medium-1 Speed Pin | 1.5 Ω | "OL" or Infinite Resistance |
| Input Pin to Medium-2 Speed Pin | 0.7 Ω | "OL" or Infinite Resistance |
| Across Thermal Fuse | < 1.0 Ω (Continuity) | "OL" or Infinite Resistance |
Verifying Power and Ground at the Blower Motor Connector
This is the ultimate test in the diagnostic chain. It answers the fundamental question: Is the problem the motor itself, or the circuit that supplies it? This test isolates the motor from the rest of the system.
First, gain access to the electrical connector right at the blower motor. With the connector still plugged into the motor, carefully probe the back of the connector (back-probing) with your multimeter leads. Turn the ignition key to the "On" position and set the fan control to its highest speed.
-
Test for Power: Set your multimeter to DC Volts. Place the red probe on the terminal for the power wire (often a thicker wire, and can be identified with a wiring diagram) and the black probe on a known good chassis ground. The meter should read a voltage approximately equal to the battery voltage, typically between 12 and 14 volts. If you have proper voltage here, you know the entire circuit up to this point—the fuse, relay, switch, and wiring—is successfully delivering power.
-
Test for Ground: The motor needs a complete circuit, which requires a solid path back to the battery's negative terminal. To test the ground side, keep the red probe on the power wire and move the black probe to the ground wire's terminal in the connector. The reading should be the same as the battery voltage you just measured. If this reading is significantly lower or zero, it indicates a problem with the ground connection. This is called a "bad ground," and it can prevent the motor from running even if the power supply is good.
If your tests confirm that you have both proper voltage and a good ground path right at the motor's connector, but the motor is not spinning, the conclusion is inescapable: the blower motor itself has failed internally. The circuit has done its job, but the motor is unable to convert that electrical energy into mechanical motion. This single test provides a definitive answer and gives you the confidence to condemn the motor and proceed with replacement.
Step 4: In-Depth Examination of the Truck Blower Motor Itself
Once electrical testing has confirmed that power is successfully reaching the blower motor, yet it refuses to perform its duty, the focus of the investigation shifts squarely to the motor assembly. The circuit has been exonerated; the component is now the prime suspect. This stage of troubleshooting truck blower motors involves a more hands-on evaluation. The motor must be removed from its housing for a series of direct tests and a close physical inspection. This process allows for an unambiguous confirmation of failure and provides insight into the specific mode of that failure, which can be instructive for future preventative maintenance. It is the final confirmation before committing to the purchase of a new part.
The Bench Test: Isolating the Motor
The most definitive method to confirm a motor's failure is the "bench test." This procedure removes all the variables of the vehicle's wiring, switches, and resistors, and tests the motor in its most basic state. It involves applying power directly to the motor's terminals from a known-good 12-volt source. The truck's own battery is the perfect power source for this test.
First, you must safely remove the blower motor assembly from the vehicle. It is typically held in the HVAC housing under the passenger-side dashboard by three or four screws. After removing the fasteners and disconnecting the electrical connector, the motor and its attached squirrel cage fan should drop out.
Safety is paramount during a bench test. The motor can produce significant torque and will jump when power is first applied. It is essential to secure the motor firmly, for example, in a vise (clamping the motor housing, not the fan) or by holding it securely on the ground away from any flammable materials.
Using a set of fused jumper wires is highly recommended. Connect one wire from the positive terminal of the truck's battery to the positive terminal on the blower motor's connector. Then, connect the second wire from the negative terminal of the battery to the motor's negative terminal. The instant you complete the circuit by touching the final connection, one of two things will happen:
- The motor will spin up to its full speed, likely with a jolt. If it runs smoothly and powerfully, it suggests an intermittent problem elsewhere in the vehicle's circuit that you may have missed, such as a faulty ground that only fails under load.
- The motor will do nothing, hum, turn slowly, or spark excessively at the connector. Any of these results confirms that the motor is internally faulty.
This simple, direct test provides a clear, binary outcome, leaving no room for doubt about the motor's condition.
Physical Inspection for Wear and Damage
With the motor on the workbench, you have an excellent opportunity to perform a forensic analysis of its failure. A close visual and tactile inspection can reveal much about why it failed.
-
Brushes and Commutator: Look at the points where the carbon brushes make contact with the motor's commutator. On some motors, these are visible through ventilation slots. The brushes should be of a reasonable length and press firmly against the commutator. If they are worn down to their nubs, they are the source of the failure. Examine the commutator itself—the copper segments of the armature. It should be smooth and have a consistent color. A commutator that is heavily grooved, pitted, or has black, burnt-looking segments indicates severe arcing and wear, often a consequence of running with worn-out brushes.
-
Bearings: The mechanical heart of the motor is its bearings or bushings. Grasp the squirrel cage fan and attempt to wiggle the motor shaft side-to-side and in-and-out. There should be virtually no perceptible play. Any significant wobble indicates worn bearings. Next, spin the fan by hand. It should rotate smoothly and quietly for several revolutions. If you feel any roughness, grinding, or tight spots, or if you hear a dry, scraping sound, the bearings have failed. This is the most common mechanical failure mode for a blower motor.
-
Squirrel Cage Fan Integrity: Carefully inspect the fan itself. These are often made of plastic and can become brittle over time. Look for any cracks, especially around the hub where it attaches to the motor shaft. Check for any broken or missing fins. A damaged fan will be out of balance, causing severe vibration and noise when running. This imbalance puts immense stress on the motor bearings, accelerating their failure. Also, ensure the fan is securely attached to the shaft and does not slip.
When to Repair vs. When to Replace
In a bygone era of automotive repair, it was common practice to rebuild components like blower motors. A technician might replace the brushes or press in new bearings. However, in the context of modern vehicle maintenance and economics, this approach is rarely viable or advisable for a standard truck blower motor.
The reality is that the cost of a complete, new high-quality replacement truck blower motor is often comparable to, or even less than, the cost of the individual components (if they can even be sourced) and the specialized labor required to install them correctly. Attempting a repair, such as soldering in new brushes, is a delicate task that, if done improperly, can lead to immediate failure. Replacing bearings often requires a press and specific knowledge to avoid damaging the motor housing.
Considering the critical role the blower motor plays in driver comfort and safety (especially for defrosting), the most logical and reliable course of action is almost always a complete replacement. A new motor assembly comes balanced from the factory with a new fan, new brushes, and new bearings. It provides a restored service life and the peace of mind that comes with a fresh component. The decision to replace rather than repair is not an admission of defeat; it is a pragmatic choice in favor of reliability, efficiency, and long-term value.
Step 5: Advanced Diagnostic Scenarios and Complications
While the majority of blower motor failures can be traced to a handful of common culprits, there are times when the problem is more elusive. Intermittent faults, issues rooted in control modules, or problems within modern networked vehicle systems can present a significant diagnostic challenge. These scenarios require a deeper level of thinking and often more advanced techniques to uncover the root cause. This is where a technician's persistence and understanding of complex systems are truly tested. Moving beyond the basic checks is essential when the initial, straightforward troubleshooting of truck blower motors does not yield a clear answer.
Chasing Ghosts: Diagnosing Intermittent Failures
An intermittent failure is one of the most frustrating problems a technician can face. The blower motor works perfectly one moment and quits the next, often without a clear pattern. The key to solving these "ghosts in the machine" is to attempt to reproduce the fault under controlled conditions.
-
The "Wiggle Test": This is a surprisingly effective, albeit low-tech, diagnostic procedure. With the system turned on and the fault present (or with the fan running, if you're trying to make it fail), systematically and gently wiggle the wiring harnesses and electrical connectors associated with the blower motor circuit. Start at the motor's connector, then move to the resistor pack, the main HVAC fuse block, and finally the wiring behind the dash control switch. If wiggling a specific connector or section of harness causes the motor to cut in and out, you have found the location of a loose pin, a corroded terminal, or a partially broken wire.
-
Thermal Issues: Some failures are temperature-dependent. A motor might run fine when the cabin is cold but quit after 20 minutes of operation once things have warmed up. This often points to a problem within the motor's windings. As the windings heat up, their electrical resistance increases. A winding that is beginning to fail may develop a break in its internal connection that only opens up when the component expands with heat. A similar thermal failure can occur in a solid-state blower control module. If you suspect a thermal issue, a can of circuit cooler (or conversely, a heat gun used with extreme caution) can sometimes be used to rapidly change the temperature of a component to see if it triggers the fault.
-
Voltage Drop Testing: When a motor runs slowly or a circuit seems to lack power despite showing 12 volts on a multimeter, the problem may be excessive resistance somewhere in the circuit. A simple voltage test might not reveal this. A voltage drop test is a more precise method. To test the power side, set your multimeter to a low DC voltage scale. Connect the red lead to the positive battery terminal and the black lead to the power terminal at the blower motor connector (while the motor is on and running). A perfect circuit would read 0 volts. In reality, a reading of up to 0.5 volts is acceptable. A higher reading indicates a significant voltage "drop" due to high resistance in a wire, corroded connection, or faulty switch upstream. The same test can be performed on the ground side by connecting the red lead to the motor's ground terminal and the black lead to the battery's negative terminal. The reading should be less than 0.2 volts. Anything higher points to a poor ground connection.
The Role of the HVAC Control Head/Switch
While the resistor and motor are common failure points, one should not overlook the switch on the dashboard that initiates the entire process. These switches contain mechanical contacts that can wear out, corrode, or break over time. The fan speed selector switch, in particular, endures thousands of cycles over its life.
Testing the switch involves checking its outputs. Using a wiring diagram, you can identify the main power input to the switch and the various output wires that lead to the blower motor resistor for each fan speed. By back-probing the connector at the rear of the control head, you can use a multimeter to verify that when you select "low," voltage appears on the "low" output wire, and so on for each speed. If you have power going into the switch but no power coming out on one or more of the selected speed wires, the switch itself is faulty and needs to be replaced.
CAN Bus and Modern Truck Complications
The landscape of vehicle electronics has grown profoundly more complex in the last decade. In many of the latest truck models, the simple analog circuit of switches and resistors has been replaced by a networked digital system. The HVAC control head on the dash may not be a physical switch at all, but rather a module that sends a digital message over the vehicle's Controller Area Network (CAN bus).
In such a system, when you turn the fan knob, the control head sends a data packet (e.g., "Set fan speed to 50%") to the main body control module (BCM). The BCM then processes this request and sends another digital command to the intelligent blower motor control module, which then powers the motor accordingly.
Troubleshooting truck blower motors in this environment is a different proposition. A multimeter is of limited use for reading digital data packets. Diagnosing these systems almost always requires a professional-grade bidirectional scan tool. This tool can communicate directly with the various modules on the CAN bus. It allows a technician to:
- Read any fault codes stored in the HVAC module or BCM.
- View live data to see the fan speed percentage being requested by the control head.
- Directly command the blower motor to turn on via the scan tool, bypassing the dashboard controls entirely.
If the scan tool can command the blower motor to run, but the dash controls cannot, it points to a problem with the HVAC control head or its communication with the network. If the scan tool cannot force the motor to run, it directs the investigation back toward the final control module, wiring, and the motor itself. While this level of diagnosis may be beyond the scope of a typical DIY repair, understanding its existence is important for knowing when to seek professional assistance.
Step 6: Replacement, Reassembly, and Final Verification
Reaching the final step of the troubleshooting process marks a significant transition: from diagnosis to action. Having systematically identified the faulty component, the task now is to restore the system to full function through careful replacement and meticulous reassembly. This stage is not merely about swapping parts; it is about ensuring the longevity and reliability of the repair. The choice of replacement component, the care taken during installation, and the thoroughness of the final checks are all critical to a successful outcome that will stand the test of time and miles. It is the culmination of your diagnostic efforts.
Selecting the Right Replacement Part
The market for automotive parts is vast, with options ranging from original equipment manufacturer (OEM) parts to a wide spectrum of aftermarket alternatives. The decision of which part to choose for your truck blower motor replacement has significant implications for performance and durability. While lower-cost aftermarket parts can be tempting, they often come with hidden trade-offs.
An OEM part is identical to the one installed in your truck at the factory. It guarantees perfect fitment, correct electrical specifications, and a level of quality control consistent with the vehicle manufacturer's standards. High-quality OE-equivalent parts from a leading truck parts supplier are designed to meet or exceed these same standards, offering a reliable alternative.
Lower-tier aftermarket motors, conversely, may be built with inferior materials. The bearings may be of a lower grade, the internal windings might use thinner gauge wire, and the plastic of the squirrel cage fan could be more brittle. An improperly wound motor might draw more or less current than the original, which can, in turn, put stress on the blower motor resistor or even the vehicle's wiring. While the initial savings may be appealing, a cheap motor that fails prematurely or causes collateral damage is no bargain. For a component as integral to cabin comfort and safety as the blower motor, investing in a quality part is a wise decision.
| Ominaisuus | OEM / High-Quality Aftermarket | Low-Quality Aftermarket |
|---|---|---|
| Material Quality | High-grade bearings, proper gauge windings | Potentially inferior metals and plastics |
| Fitment | Guaranteed to match original specifications | May have slight variations requiring modification |
| Electrical Specs | Matches original amperage draw and resistance | Can vary, potentially stressing the circuit |
| Balancing | Factory balanced for smooth, quiet operation | May be unbalanced, causing noise and vibration |
| Warranty | Typically offers a comprehensive warranty | Limited or no warranty |
| Longevity | Designed for long service life | Prone to premature failure |
A Step-by-Step Guide to Installation
With the correct replacement part in hand, the installation process can begin. Precision and cleanliness are your allies here.
- Safety First: Before you begin, ensure you have disconnected the negative terminal of the truck's battery. This prevents any possibility of an electrical short circuit while you work.
- Prepare the Area: Before installing the new motor, take a moment to clean the area from which you removed the old one. Use a vacuum and a damp cloth to wipe out the blower motor housing within the HVAC plenum. Any residual dust or debris left in the housing will be the first thing your new motor ingests and blows into the cabin.
- Install the New Motor: Carefully guide the new blower motor assembly up into its housing. Be mindful not to damage the squirrel cage fan during this process. Align the mounting holes and start all the screws by hand to ensure they are not cross-threaded. Once all are started, tighten them securely but do not overtighten, especially if the housing is plastic.
- Reconnect and Reassemble: Plug the electrical connector firmly into the new motor. You should feel or hear a click as it locks into place. If you removed a cabin air filter as part of the process, now is the perfect time to install a new one. Reassemble any trim panels or the glove box that you removed to gain access.
- Reconnect the Battery: Once everything is reassembled, reconnect the negative battery terminal and tighten it securely.
Post-Installation System Check
The final act of the repair is to verify that it was successful. Do not assume everything is working correctly; test it thoroughly.
- Start the Engine: Turn the key and start the truck.
- Test All Speeds: Turn the fan control on, starting at the lowest setting. Let it run for a moment, then cycle it up through each individual speed to the highest setting. Confirm that you have distinct and increasing airflow at each step.
- Listen Carefully: As you test the speeds, listen for any unusual sounds. A new, quality motor should be smooth and quiet, with only the sound of rushing air. Any rattling, whining, or grinding indicates a problem—either with the new motor itself or with the installation (e.g., a loose mounting screw).
- Check All Functions: With the fan running, test the other HVAC functions. Switch between fresh air and recirculation. Activate the air conditioning and confirm that cold air is being delivered. Turn on the heat and ensure warm air is flowing. Direct the airflow to the floor, dash, and defroster vents to confirm that the blend doors are operating correctly in conjunction with the new blower.
Completing this final verification provides the closure and confidence that the job has been done right. You have not only replaced a part but have also successfully navigated the entire diagnostic and repair process, restoring a critical system and deepening your understanding of your vehicle. This methodical approach is the hallmark of a true professional and an empowered owner.
Usein kysytyt kysymykset (FAQ)
Why does my truck's blower motor only work on the highest fan speed?
This is a classic symptom of a failed blower motor resistor or resistor pack. The lower fan speeds route electricity through a series of resistors to slow the motor down. The highest speed setting typically bypasses this resistor and sends full battery voltage directly to the motor. When the resistor pack fails (often by burning out), the lower speed circuits are broken, but the direct-wired high-speed circuit remains functional.
Can a bad truck blower motor drain my battery?
Yes, it is possible. If the motor has an internal short circuit, it can create a parasitic draw that drains the battery even when the truck is turned off. More commonly, a motor that is beginning to seize due to bad bearings will draw significantly more electrical current than it should while running. This can put a heavy load on the alternator and battery, potentially shortening their lifespan over time.
How much does it typically cost to replace a truck blower motor?
The cost can vary widely depending on the make and model of the truck and whether you perform the labor yourself. The part itself can range from around $50 for a common aftermarket motor to several hundred dollars for an OEM part for a newer or more complex vehicle. If you take it to a repair shop, labor costs can add another $100 to $300 or more, as access on some trucks can be time-consuming.
Is replacing a truck blower motor a difficult job for a DIYer?
The difficulty level ranges from very easy to moderately difficult. On many trucks, the blower motor is located in an accessible spot under the passenger-side dashboard and is held in by just a few screws. In these cases, it's a great DIY job. However, on some models, it may be located deep within the dashboard, requiring the removal of numerous other components to access it, which can be challenging for a novice.
What causes that burning smell when I turn on the fan?
A burning smell from the vents can have several causes. It could be debris like leaves or plastic that has been pulled into the system and is resting on the hot blower motor resistor. It can also be a sign that the resistor pack itself is overheating and about to fail. Most concerningly, it can indicate that the blower motor is overheating due to worn bearings or an electrical fault, which is a potential fire hazard that should be inspected immediately.
How long should a new truck blower motor last?
A quality OEM or OE-equivalent blower motor should last for many years, often 100,000 miles or more, under normal operating conditions. Lifespan can be affected by factors such as how often the fan is used, the climate, and the condition of the cabin air filter. Keeping a clean filter in place is the single best thing you can do to maximize the life of your blower motor.
Conclusion
The endeavor of troubleshooting a truck blower motor, when approached with a structured and inquisitive mindset, transforms from a daunting task into a manageable process of elimination. The journey from deciphering the initial symptoms—the subtle noises and changes in airflow—to the definitive confirmation with a multimeter is a testament to the power of systematic diagnosis. By first addressing the most straightforward potential issues, such as the cabin air filter and fuses, one can often find a simple solution without unnecessary labor. When the problem is more deeply rooted, a logical progression through electrical tests of the resistor, wiring, and the motor's power supply provides clear, evidence-based answers, removing guesswork from the equation.
Ultimately, whether the resolution lies in replacing a simple resistor or installing a new motor assembly, the core principle remains the same: a successful repair is built upon an accurate diagnosis. This guide has sought to empower truck owners and technicians alike, providing the knowledge to move confidently from symptom to solution. By understanding the function of each component and the methods to test its integrity, you take control of the repair process, ensuring not only the restoration of cabin comfort but also the reliability and safety of the vehicle's essential systems. The satisfaction of a job done right, underpinned by quality parts from a trusted source like one with a mission to serve customers with integrity (https://www.dpfsupplier.com/about-us/), is the final reward.
Viitteet
Mankiewicz, B. (2025, April 26). The importance of multimeters and test lights in DIY car repair. Bultaco Parts. https://www.bultacoparts.com/basic-tools-and-equipment-multimeter-and-test-light
Factory Manuals. (2025). 2015 Ford Focus repair manual.
Erjavec, J. (2020). Automotive technology: A systems approach (7th ed.). Cengage Learning.
Halderman, J. D. (2020). Automotive electricity and electronics (6th ed.). Pearson.
Gilles, T. (2018). Automotive service: Inspection, maintenance, repair (6th ed.). Cengage Learning.